How to fix and repair your cloudy solar LED path lights DIY
HOW TO FIX AND REPAIR YOUR CLOUDY SOLAR LED PATH LIGHTS DIY
 In these days, solar LED path lights are everywhere in our garden, yard, walkway. It is popular due to its easy to install and no bill. But we often found that over time the solar panels on top of the solar lights will become cloudy, hazy, that only a small amount of light gets to them anymore, the lack of light being able to be collected by the solar panel has greatly diminished. Less light collected means less power stored in the batteries, that the run hour of the lights is shorter, that is why we often found after several months after we installed the solar garden lights, it lasts light shorter and shorter in the night, from 8 hours at beginning to only 3-4 hours. That is just because the solar panels deprived of sun lighting due to the cloudy or haze or its surface.
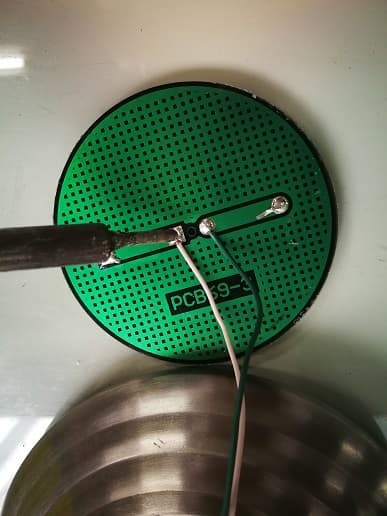 For most of us, when we are facing this problem, we just throw them away and buy a new one. That is reasonable for which are less cheap worth only one-dollar mini path lights where you buy from the dollar shops. But most of the time, it worth much like $18 for 6 pack you buy from Home Depot, or maybe $74.97 with 10 pack. That is a wasteful if we just throw them away, especially or these metal constructions with glass lens, that are not easy aged, and it is expensive to change a new one.
My first thought is how to rejuvenate these solar LED pathway lights, but do not cost too much.
It is easy to find the solution on internet; they will tell you different ways to fix it. Typically, the most two used items are the nail polish and sandpapers. You can easily find it on the YouTube that show you the detailed solution. But I don’t think it can solve the problem fundamentally, you will find it will be soon cloudy or haze again, maybe one month, especially in summer. Because most of the solar path lights in the market used the epoxy resin solar panel, it is easy aged and become white at the surface of the solar panel.
Today we share another way to replace the epoxy solar panel with a laminated one, the differece of laminated solar panel and epoxy solar pane, the PET laminated solar panel does not have the issue of turning yellowish and the lifespan is longer 3 years or more. The detailed process is as below:
Step 1: get all the tools maybe needed and the new PET laminated solar panels and batteries ready.
- One slotted screwdriver
- One Philips screwdriver
- rubbing alcohol spray(maybe needed)
- hot melt adhesive
- Electric iron
- New PET laminated solar panel for replacement
- New rechargeable batteries (AA NI-MH 1200mah)
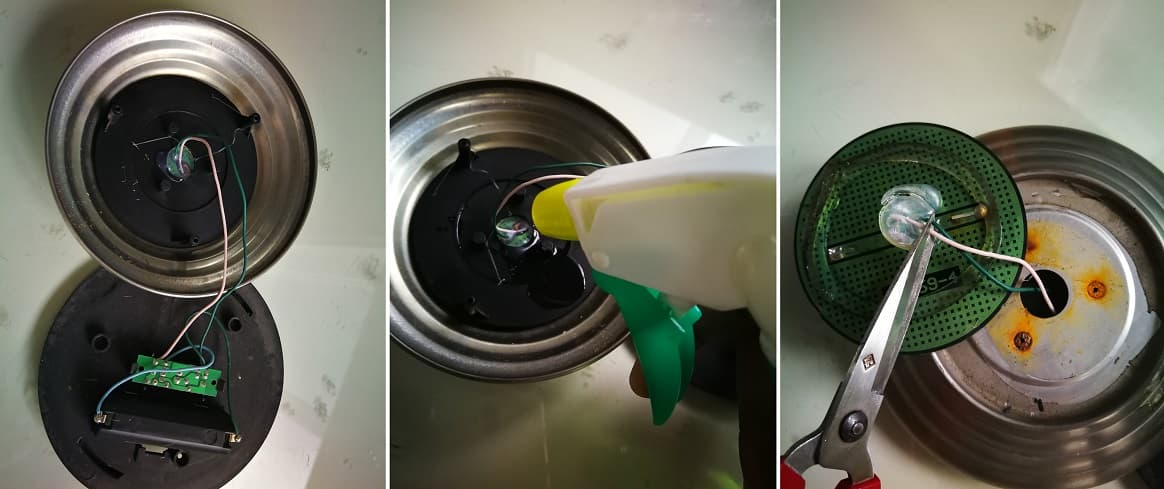
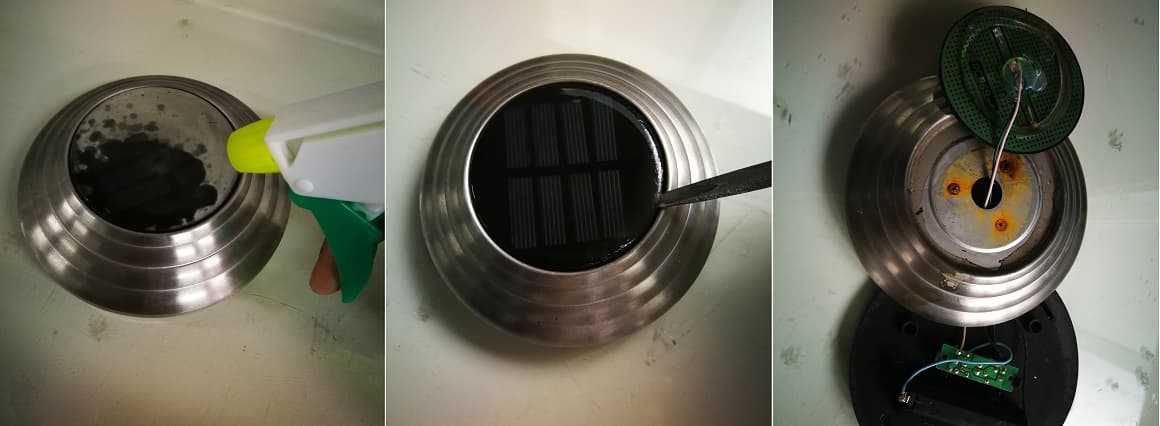
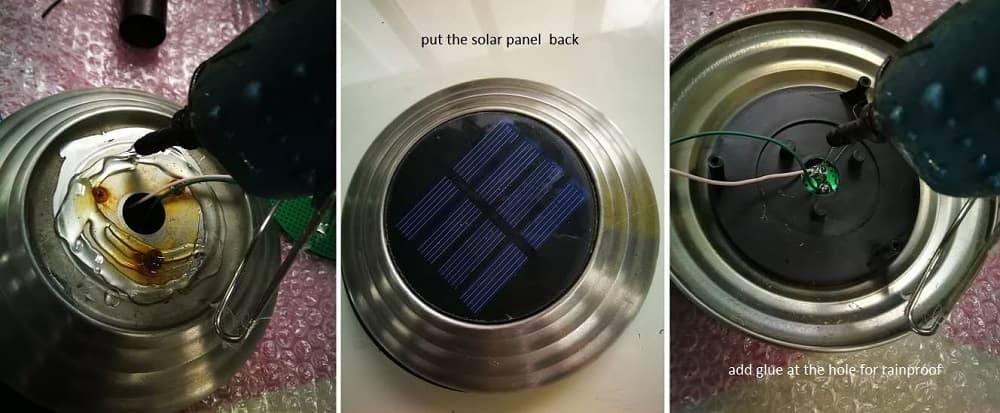
Step 2 : Turn the lamp shade or the cage out from the top cover, remove the screw by a screwdriver and open it, you will find two wires connected to the solar panel, you can cut the wires off at the end ( make sure it is longer enough to connect them back to the new panel later). Add some rubbing alcohol at the hole, or use the electric drill to drill a hole at the center. Pry up the solar panel by the slotted screwdriver, if it is difficult, spray some rubbing alcohol at the groove around the solar panel, that will make it easy to pry up. If it is still difficult to open it, considering to use the drill to destroy it. after that clean the glue on the top cover.
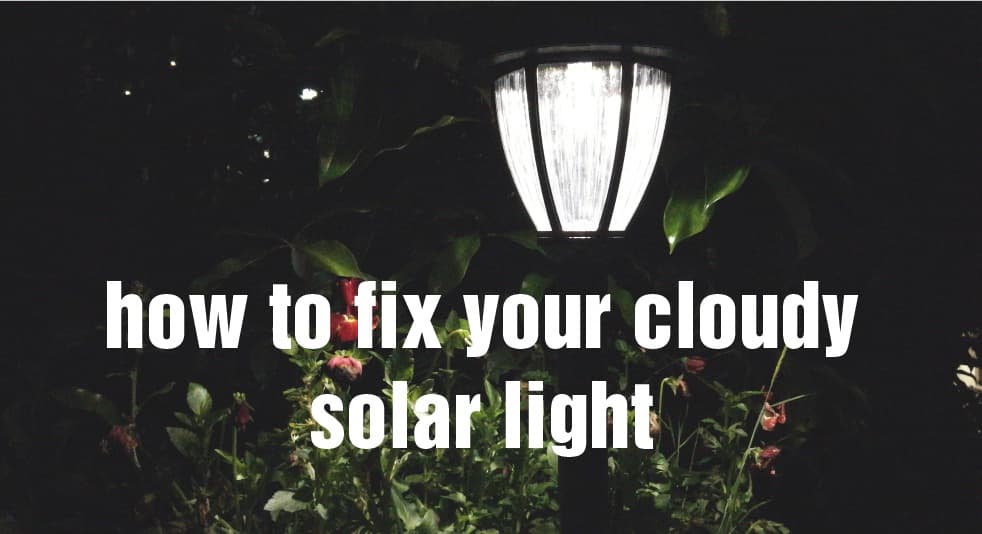
Step 3: put the wire through the hole and solder it at the new PET solar panel, generally the pink or red wire is for positive and dark green or black wire is negative, if it is correctly connected, the light will be turn off when the solar panel is under the sun lighting, or you connect the wrong positive/negative end, then change it .

Step 4: after the wires are correctly connected, add some glue with the hot melt adhesive at the top cover, put the solar panel on it, and then add some glue at the back hole of the top cover for rain proof as well. Now it is done.
Step 5: Before you put the screw back, check the light can turns on when you cover the solar panel or put it in the dark, and turns off when put it in sun lighting. If it works correctly, put the screws back. If it is possible, replace the old battery with a new one, as after half or one year, the batteries life span is short, the new one can keep it run longer in the night. The batteries can be easily bought in the HD store, there are two kind of batteries in store, one is LiFePO4 battery which is 3.2V ,and one is AA NI-MH battery, 1.2V, check the old batteries in the light, and choose the same type is OK , the capacity bigger will be better .
Another important note is solar panel voltage must be matching the voltage of battery. Normally the 4 solar cells panel is for 1.2V battery like the AA NI-MH battery, while the 8 or more cells panel is for 3.2V LiFePO4 battery. Please check carefully when buy or install it.
If you are not very care about the appearance, you can choose the bigger power solar panel and bigger capacity batteries, the bigger solar panel can collect more sun lighting and can make sure it can light whole night.
Now all is done, stick all the lights back in your yard, and enjoy its glowy goodness. The PET solar panel can make you don’t need to worry about the cloudy or yellowish and can work longer.


评论
发表评论